“Your website is prospective patients’ first impression of your practice.” – #TeamBeacon
Is it time to redesign the website for your orthodontics practice? Digital marketing experts recommend that every business, practice, and organization–regardless of industry–redesign their website every 2-3 years. New products or services, staff, and even changes to website best practices can all mean your site is ready for an update!
Updating your practice website can feel like a daunting task. But we are here for you.
After over 20 years in the marketing industry, we have developed a proven process for our website services that we believe is the greatest thing since sliced bread! It is the very process that we walk every one of our clients through. We hope this process grants you and your team smooth sailing as you tackle one of your biggest projects yet.
1. Meet with Your Orthodontics Team
The first step in redesigning your orthodontics website is to determine why you are doing what you are doing, what your goals are, and what a successful website design looks like to you. Gather all of the key people on your team into one room and ask yourselves these questions. Take some time to look at competitors’ websites, orthodontics websites from across the country, as well as any websites that you generally like the look and feel of, identifying concrete specifications for your own redesign. You may be surprised by the concept you begin to develop through collaboration! Here are just some of the questions that we ask our clients at the beginning of their website services with us:
- What are you trying to achieve as a practice? What sectors of your practice are you trying to grow?
- What are the primary and secondary purposes of your website? What do you expect it to accomplish?
- What information do you want your patients to find quickly on your website? Do you have any primary categories of products or services to highlight prominently?
- Of the website designs that you like the look and feel of, what features do you like?
- What type of imagery do you prefer to use? Is there any imagery that you like to stay away from? Do you have any official branding guidelines to adhere to?
We also discuss general marketing information (such as target patients and differentiators) with our clients in order to be as strategic as possible with their website design. Be sure to talk about these important facets of your marketing strategy with your team! Information like who your target patients are and how you stand out in the market can completely change how you choose to position your orthodontics practice online.
2. Map Out A Plan for Your Website Design
Once you have laid the foundation of a strong vision for your new website design, it is time to put your creativity to work! Using the information you gathered during the meeting with your team, you are going to create a sitemap demonstrating all of the pages you want on your site. A sitemap is simply a flowchart, and it can be as simple as a bulleted list. Here is a standard sitemap for a basic, “five-page” website:
- Home Page
- About Us
- Services
- Service A
- Service B
- Service C
- Blog
- Contact Us
Now that your sitemap is in place, you are going to create a wireframe for each of these pages, containing all of the design and content elements your team requested.
What is a wireframe, you may ask?
“(A wireframe is) an image or set of images which displays the functional elements of a website or page, typically used for planning a site’s structure and functionality.” – Google
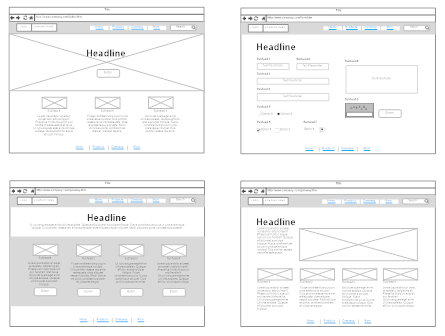
It may sound complicated, but a wireframe is nothing more than a drawing or sketch of what you want your web pages to look like, using only boxes and lines. At this point, you do not want to get too detailed–you will have the opportunity to do that in the development step! Simply outline where you want your images, headers, written content, and buttons on each page. Here is an example wireframe, for your reference:

Source: SmartDraw
If you would like to practice wireframing a good website design, start by looking at some of your favorite websites and trying to imitate their structure with your own wireframe. There are a lot of easy wireframing tools available online. One of them is MockFlow, which offers drag-and-drop wireframing and a free package for basic users.
While you are wireframing your new website design, you will want to be thinking about the written content your team wants on your website and how to execute those concepts on each page. Now is a good time to start writing this content as your vision begins to form, but it is okay to put placeholder content such as “lorem ipsum” in your wireframe for now.
3. Write the Content as an Orthodontics Team
With wireframe in hand, you are now ready to fill in your placeholder text with real, written content that speaks to the soul of your orthodontics practice! There are several important concepts to keep in mind as you go about this process:
#1 Keywords – If one of your goals is for your website to rank on the first page of Google, pay attention to the keywords and phrases prospective patients are using to search for orthodontics services! You will want to incorporate these keywords throughout your text. This is called search engine optimization (SEO). We use the Google AdWords Keyword Planner at Beacon to do our keyword research. It is best practice to focus on one or two keywords per page and place them naturally 5-10 times throughout 400-600 word content, but do not go overboard! Keyword stuffing makes content unreadable–although your website will rank high at first, it will quickly lower in ranking as the Google algorithm learns that everyone who visits your site leaves because they cannot read your content.
#2 “Catchy” Headers – The rate at which people are moving through websites is getting faster and faster as more of the general population become tech savvy. Be sure to use headlines that catch attention at reasonable intervals throughout your content to keep prospective patients engaged. Place relevant keywords in your headers as well to boost your search engine ranks.
#3 Quality & Quantity – Although it is best practice to write 400+ words for each page of your website, do not merely write content for content’s sake. You might put prospective patients to sleep! Keep your content engaging and write in second person, directly addressing “you,” the reader and speaking to the heart of what they want in an orthodontist. Split your content up into paragraphs and use tools like headers, bullet points, and other formatting to keep your content visually interesting and palatable.
Finally, always, always, always include a call-to-action (CTA) at the end of your content! A CTA indicates to the reader what they can do next to act on what they have just read. It should be hyperlinked. For example, a common CTA for an orthodontics practice is “Schedule a Free Consultation,” linked to a contact form.
4. Implement Your Website Design
Once you and your orthodontics team are satisfied with your sitemap, wireframe and content, it is time to design your new website! This may not sound like an “easy step” at first glance, but there are actually many useful tools for people who are just getting started with website design. We use a hefty version of WordPress at Beacon that requires custom coding, but the company also offers a variety of packages available for beginners that allow you to do some customizing of your website without touching the code.

Source: WordPress
Your first task once you have established an account with WordPress is to begin the guided setup process and pick a website theme that fits your wireframe! You will then be able to customize your website design within the parameters of a basic package using the options available. Use the colors and fonts of your orthodontics practice, add the images you like, and upload your written content. WPBeginner is a great resource for any questions you may have throughout this process.
5. Set Your Website Design Live!
If you are finished with your website design and you are happy with how it turned out, you are almost ready to press “go!” First, there are a few things you will want to check to make sure everything is in order.
We have created a pre-live checklist for our staff to go through before the launch of every one of our client websites. Here are just a few of the things on that list:
- Ensure all links across the website, including all buttons, icons, and linked images, are working properly.
- Check the contact form to make sure it is sending to the correct email address.
- Look at the website in all major browsers as well as on mobile to ensure it looks good on all platforms.
Most basic WordPress websites are already “live” from the get-go, however, now is the time to take the domain name from your old website and point it to your new one! Your domain name is the address at which your website is located, for example, our website is located at www.beaconmm.com. Log in to the account you were given when you first purchased your domain and use the tools provided to point it to your new website. You should be able to see your new website at your domain name within a matter of minutes.
Congratulations! You did it! If you have followed all of these steps, you should have a fully-functioning, up-to-date website that is ready for prospective patients.
We are happy to share our proven process with you, however, if you get stuck on any part of this, please let us know! Our team would love to come on board with your website project and help you see it through to completion. If you are interested, please reach out to our VP of Marketing Jennifer Christensen to schedule a free consultation.
Happy marketing!